
Correct installation of the Road Ranger hardtop. Most common errors.
Correct installation of the Road Ranger hardtop. Most common errors.


It would seem that the installation of any hardtop on the truck bed of a pick-up is dead easy - it’s just an accessory! We know from experience that this is not the case, so, in the following post, we will present the most important aspects of correct installation and outline the errors which installers make.
At the very beginning, it should be mentioned that the incorrect installation of the hardtop may cause damage to the hardtop itself (more details will be given below), car paint - mainly in the upper part of the truck bed walls, and problems with the vehicle’s electronics when the electric system is not properly connected. Each manufacturer should provide its hardtop with an installation manual prepared in a clear manner which leaves no room for second-guessing. In addition to the manual, Road Ranger publishes service videos on its YouTube channel where the correct installation of hardtop on different pickup models is presented. Undoubtedly, it is a great addition to the hard-copy manual. For an example of an installation video, click HERE.
You need three to four hours to install the hardtop and it takes approx. ¾ of the time to lay and connect the electrical wiring harness.
Installation steps:
Unpacking
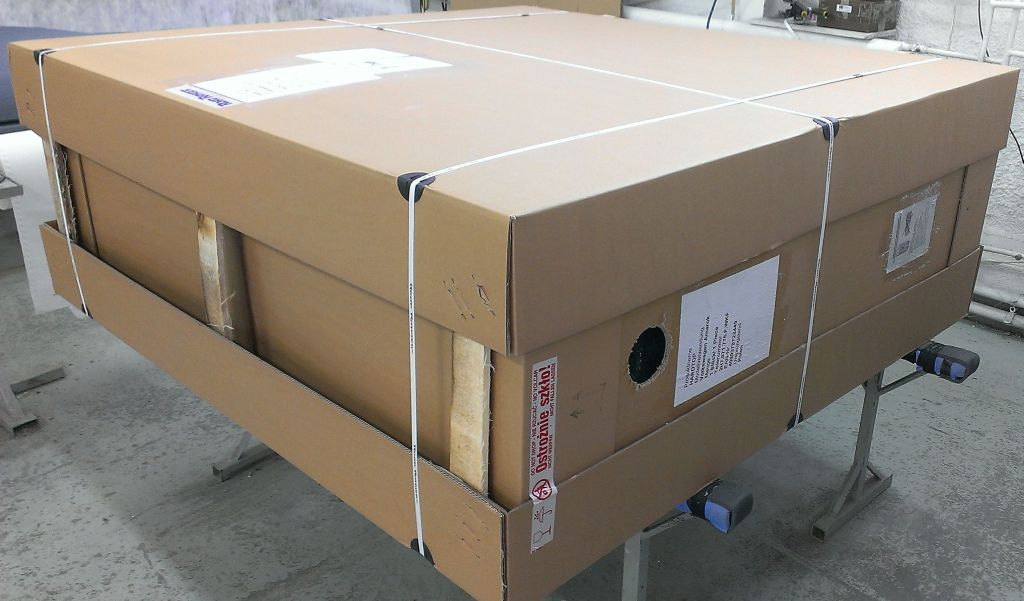
Road Ranger hardtops are supplied in a cardboard box on a wooden pallet where they are positioned vertically (with the front wall down). The box should not be damaged in any way. Broken cardboard is evidence of damage in transport, which should be reported to the courier, and a damage protocol needs to be drawn up. Look through the side holes to see on which side the hardtop roof is located, and then place the box in such a position that the hardtop is in the correct position, i.e. with the roof up. The picture below shows a hardtop packed in the correct position:
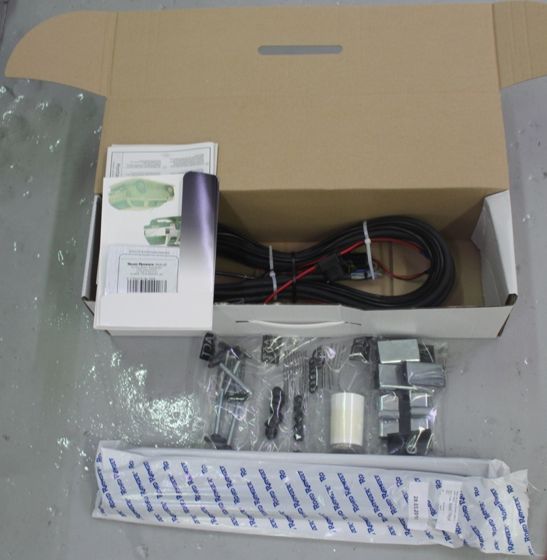
Cut the banding tapes and safety straps, open the top of the cardboard box and, taking great care, cut the bubble wrap and non-woven fabric which protects the paint from scratches. After unpacking, look over the product and check it for possible damages to the paint. Thanks to the internal protections, damages to the product during transport are extremely rare. The package also includes a smaller cardboard box with all the necessary installation elements and documents: the hardtop’s warranty booklet, necessary instruction manuals and the so-called hardtop passport, or ABE (Allgemeine Betriebserlaubnis) document, i.e. entry into service. See the picture below for an example of an installation kit:
Connection of the electrical wiring harness
In most cases, the Road Ranger hardtops are fitted with a heated rear window, third STOP light (if the vehicle does not have the third STOP light in the tailgate), hardtop's rear window lock integrated with the vehicle’s central locking system, interior LED lighting and central lock or side flap/window actuators. Therefore, you need to connect the electrical power supply from the battery and other functions by connecting wires to the appropriate socket. In our case, it is the area near the steering wheel post or steering wheel threshold. In most vehicles, the harness is pulled through the hole in the bodywork near the left rear lamp after it has been removed. Only in the case of VW Amarok, is the harness pulled through the vehicle’s third STOP light. In the basic versions of hardtops fitted only with internal (manually-operated) LED lighting, and possibly with the third STOP light, the hardtop is connected “in short”, i.e. by connecting to the vehicle’s rear lamp. The instruction manual includes a detailed wiring diagram specifying the wire colours.
Protection of the truck bed
After the electrical wiring harnesses have been pulled through and connected, but before the hardtop has been mounted, prepare and secure the vehicle’s truck bed. Start with protection of the technological holes in the truck bed through which water may penetrate in the case of heavy rainfalls or when washing the car under high pressure. For this purpose, use a polyurethane sealing compound.
Note! This is the right moment to mention that any accessories such as hardtop, hard tonneau cover or roll cover must not be installed on an over-rail polyethylene bedliner, i.e. where the edges cover the upper part of the truck bed. For installation of the above-mentioned accessories, under-rail bedliners are used. This information is provided in the manual, and its non-compliance may result in the refusal of a compliant about the hardtop.
Next, degrease the upper edges of the truck bed walls and cover them with the transparent tape included in the installation kit to protect the paint at the contact point of the hardtop with the vehicle’s truck bed. In addition to taping, micro-rubber (foam) is stuck onto the hardtop angles to additionally protect this area and provide extra sealing at the joint to reduce water or dust penetrating into the interior.
Installation of tailgate water protectors
Road Ranger RH04 and RH05 hardtops are supplied with tailgarte water protectors, i.e. thermoformed plastic components (ABS), which provide extra sealing at the sensitive points, i.e. the gaps on the left and right side of the vehicle’s tailgate. Protectors are fitted with rivets included in the installation kit or (for Ford Ranger) with the use of the original components in the area of the rear lamp. If necessary, the bedliner edges should be adjusted by cutting to make the protectors fit tightly with surface of the truck bed.

Hardtop positioning
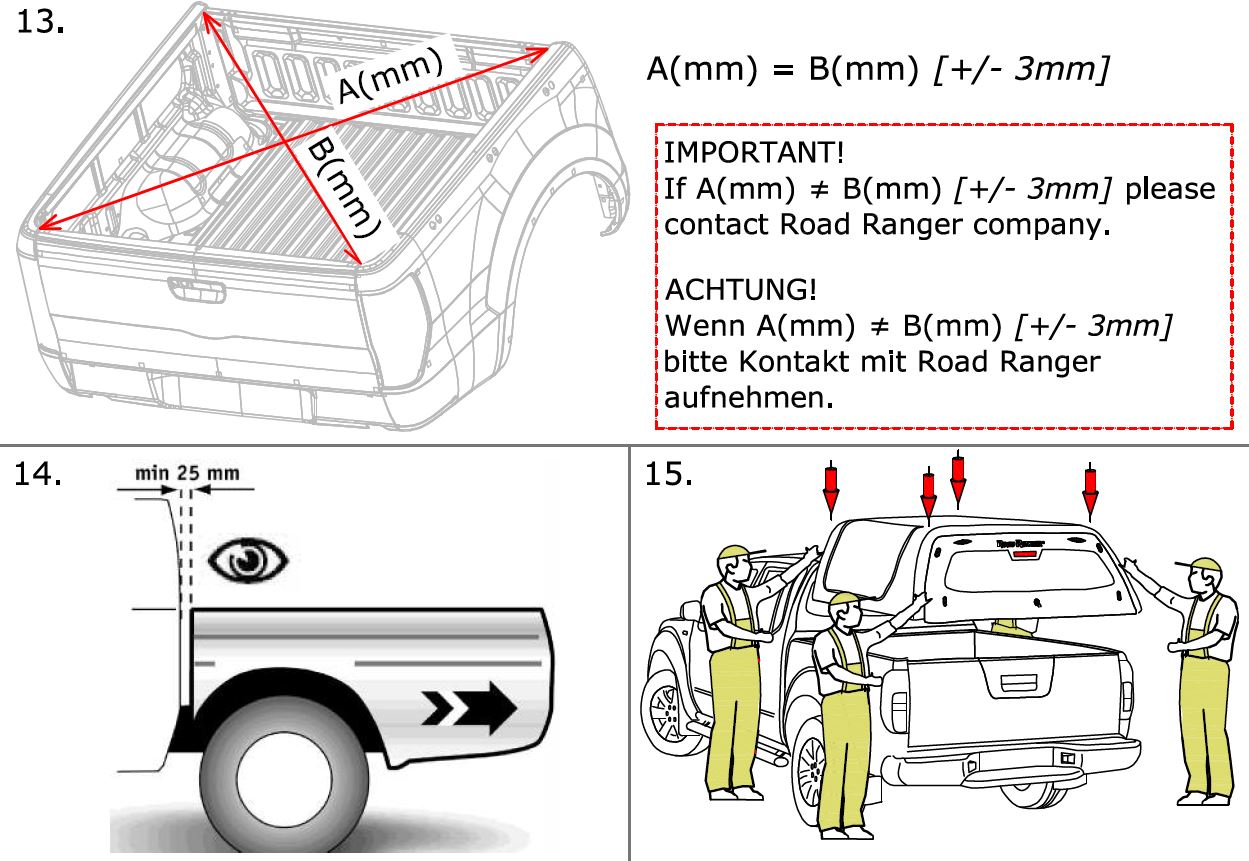
When the vehicle’s truck bed has been prepared, you can carefully mount the hardtop with the hardtop's rear window open. This should preferably be done by four people. Check and position the hardtop in accordance with the manual and visual fitting. The distance between the hardtop and the vehicle cab should be consistent with the distance between the cab and the truck bed, and visually make one whole. If the hardtop is not positioned correctly, i.e. too close to the vehicle cab, the tailgate “pushes” against the vehicle’s rear window, which may cause problems with opening and closing the hardtop rear window, and may also result in its damage or damage to the paint of the vehicle's rear window.
The lower corners of the hardtop near the rear window (marked on the picture below) cannot be in direct contact with the surface of the platform.
If necessary, the hardtop should be stretched in its rear section so as the angles fit the vehicle’s truck bed well. After the correct positioning, you may start screwing in the mounting clamps using a torque wrench with a force set as specified in the manual. The rear window seal must be mounted on the edge of the previously fitted water protectors. If necessary, cut the excess seal so as its lower part touches the truck bed floor.
Rear window regulation
All hardtops are mounted in the factory on support frames which exactly reflect the vehicle’s truck bed and the moving parts, such as side flaps/windows and rear window. They are checked and regulated before packing. Pickups are commercial vehicles so the manufacturers allow dimensional differences, e.g. the diagonals of the truck bed on vehicles of the same brand may vary from a few to even several millimetres. Therefore, in the event when the tailgate latches (left, right, both) do not close properly, adjust the rods or halter positions. The correct position of the hardtop also affects this. For a more detailed description of this situation, see THIS POST.
Most common errors:
Some of the errors to be avoided are outlined below. They result from the installation steps described above:
- No protective film on the truck bed edges
- No connection of the electrical wiring harness
- Wrong hardtop position (skew) on the platform
- No installation of tailgate water protectors
- Clamps tightened too much (crushed micro-rubber)
- No regulation of rods and latches after installation (if necessary)
- Failure to provide the user with the warranty card
- Damage to the paint coating
During the standard maintenance check, however not less frequently than every 30,000 km, the hardtop should also be subject to a short inspection, i.e. it should be checked for the proper positioning and tightening of the mounting clamps, and the system of latches, halters and tie rods should be checked for the trouble-free opening and closing of the rear window and side flaps/windows. The list of operations is described in detail in the warranty book.
We hope that the installation process described above will be helpful and the hardtop will serve you without problems for many years of operation.
![]()
Let's meet on the road.
Add comment